How to Use Reverb: A Beginners Guide
How to Choose the Right Reverb
So, you’ve created some killer sounds, know what reverb is and now you’re here to find out how to use reverb? Wicked. But before we can even start talking about how to use reverb, you need to know how to choose the right one for your sound source!
Like most things, some reverbs are better on certain sound sources than others. This is usually down to personal preference, so that makes it a little easier to choose.
Emotions and feelings should be at the top of your reverb-orities list. What do you want the sound to emote, and what do you want it to say to your listener? Do you want it to sound industrial and metallic, or euphoric and warm?
Being aware of the harsh and muddy qualities of your reverb and actively stamping them out should be next on your list. As well as these two qualities, you should be aware of how “spacey” your reverb is. All your reverbs will come together to make one big reverb at the end of the production process, so keeping tabs on what each is doing is a must!
Being aware of these factors is very important to the final quality of your sound source and your final mixdown. By not being aware and therefore flying blind, you’re limiting the potential of your music!
Do you want a natural-sounding reverb to emulate a real room? How big is the room? Is it a room, a chamber or a hall? Or do you want a reverb that is much more audible as an effect?
Then think of what kind of space you want to emulate. A bar? Call, select a room reverb. But you also need to consider the material of the walls, which is how reverb plugins label their presets.
If you wanted a reverb that creates an effect rather than emulating a physical space, a spring or plate reverb will bring your sound to life! These can create a metallic and bold effect on a sound source, but they can also add warmth to lush pads and keys!
Getting Started with Reverb
So, now that you’re up to date and in the know about which reverb will work best for you, it’s time to load up that digital weapon!
Now we can talk about how to use reverb and what you should & shouldn’t do.
Before we dig in, we need to explore a few things that are very important things that new producers get wrong and then run into a lot of problems.
- Mix any reverb you use in headphones and not monitors. This will give you a far better idea of what your reverb is doing because there is nothing the reverb can bounce off of in the physical realm.
- Avoid putting reverb on your master bus. This isn’t to say that you shouldn’t apply a reverb to your final master audio, though. That is a different process altogether, so we’re just going to focus on individual sources and aux tracks.
- Do not put separate reverbs on every channel… we’re about to explore this.
- Make sure that you use aux, buses and sends to control your reverb! We’ll explore this shortly.
Any individual sound that’s created inside a room will generate its own reverb. So, you want to translate that into your mix & apply individual reverbs to different sounds (within reason).
Not everything needs reverb. Usually, the louder/wetter a reverb is… the further back in the mix the sound it’s applied to will sound. If you apply reverb to all sounds, you’re going to give your CPU a lot of work to do and the dynamics in your track won’t have that much variation!
How Does Reverb Control Depth?
It’s time to get your imagination flowing.
Envision your music as a landscape. This landscape is your stereo field, but it’s more detailed than just left to right. Picture elements from front to back too!
Now, where do your instruments and elements sit in this stereo field? You know that you can control left to right with panning, but did you know you can control front to back with volume and reverb?
As we said earlier, all of your reverbs will come together to make one big reverb later on. This is why just turning up the reverb on individual channels while your arrangement is muted is a bad idea. This gives you no context as to what’s going on in the song, and it also doesn’t allow you to gauge how loud your reverbs will be at the end of the production process.
Reverb is something that should be applied later in the mix, not when you’ve only got one or two elements ready for it. Some sounds may sound better with reverb applied before compression or after it. You need to be able to scope what your channels are doing and how reverb should be applied to the best effect. Think about the bigger picture!
A sounds’ frequency response is very important to be aware of when reverb is to be applied. If you applied reverb to bass or kick drum with their low-frequency responses, they will inevitably sound muddy.
How Can I Control Depth with Reverb?
Now it’s time for you to take control.
Leave your kick & bass sounds 100% dry. If you wanted to have a kick drum that had a reverb tail, layer something on top of the kick like an impact SFX & apply reverb to that.
When it comes to the rest of your drums, make sure there’s more reverb on your tom drums than on your snares. This will push the toms further back in the mix and give your snare more power. Apply more to cymbals and hi-hats too!
If you have recorded vocals or vocal samples that are there to take the listeners attention, be sure to add more reverb to the elements around it so they tuck in behind the vocals. Automation, automation, automation!
One last general tip we have is to lightly apply reverb to any vocals themselves! Don’t drench them as you’ll lose them in the stereo field… just enough to keep them front & centre.
It may also help to drop the output volume of your reverb plugin down by 2 to 4 dB beneath the sweet spot where you like it. This allows for headroom should you make changes in the future, it will ensure you don’t reach your dBFS ceiling too quickly, and it means your reverb isn’t too loud.
Reverb is to be used subtly, so by attenuating the output of the reverb (and any signal leaving the reverb) you’re ensuring nothing is smacking your listener in the face rather than adding a sweet effect.
Time Controls
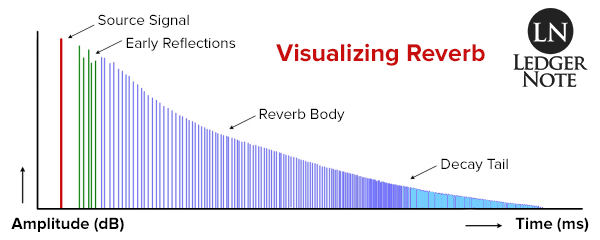
Like we discussed in our previous reverb article, early reflections (1 to 30 milliseconds) are the first audible part of a reverb. These will hit your ears faster if you use a smaller virtual room, or slower in a bigger room.
Body (30 to forever if you chose) is the main time variable, and you have full control over it. If it lasts longer, the room will feel larger to you or your listener. The instrument or element will also seem further back in the mix with a longer body.
Decay (tail of reverb as it drops below about 60dB) can either happen very fast and cut the reverb off, or it can decay slowly and trail off.
A large room and longer reverb isn’t always a good option. If you have a lot going on, then a large room will sound messy. If you have a break between verses and are going for something that only needs a pad and some percussion, then a large room and longer reverb would be perfect for the pad!
This is why context and knowing what’s happening in your arrangement is very important!
Take your time with these variables. Getting them wrong can lead you down a path that takes you to a mixdown that’s not very clean!
Create Aux and Bus Tracks, Use Sends
A bus is a dedicated channel on your mixer that you have chosen to send multiple signals to. These multiple signals come from other individual channels on your mixer.
Commonly referred to as return tracks, aux tracks also accept signals from multiple other channels. However, with an aux track, you also send the same multiple signals to the master bus as well as the aux track.
A send is simply a parameter. It’s the knob that allows you to attenuate the level of the signal being sent to your aux track or bus track.
We’ve explored these in far more detail in our Aux, Bus and Send Tracks article. By using these three elements and parallel processing your reverb, you can keep your mix clean and also ensure the original signal is unaffected if you are unhappy with your reverb.
What About Mono and Stereo Reverb?
A stereo reverb can sound very lush, so it’s tempting to slap one on all instruments. I used to make this mistake!
All this leads to is a very airy song that has no gripping dynamics and sounds too mushy. Turning down all of your reverbs will not help you out either.
To keep things clean, stereo imaging is very important. If you have a synth that’s doing some funky things 55% to the right in your stereo field, you also want its reverb to be approaching the listener from 55% to the right. This will keep the reverb within the centre of gravity of the channel it’s applied to.
The solid thing about your DAW mixer is that this process will happen automatically. If you pan via your mixer, the reverb will also be panned as it’s on the same channel. Or, of course, maybe you have sent the channel to an aux track after it’s panned and that’s where the reverb is being applied.
All of this is totally fine, but it’s half the story.
What’s important is to choose either a mono or stereo reverb. If you have used a mono reverb and panned it, it will sound like the reverb is right behind the sound. If you have used a stereo reverb and panned it, the reverbs’ centre of mass will be panned 55% to the right… but its echoes will be fanning across your entire stereo field… and that is why your mix sounds airy and mushy.
So, with that, should you use mono or stereo reverbs?
The answer is not a one size fits all. What do you have going on in your arrangement? Is your drum kit, excluding the kick, centralised? Do you have a riser that’s panning from left to right?
For your central elements, a stereo reverb will do the trick. If you have a panning element or have that funky synth doing its thing 55% to the right… then mono all the way!
This technique will preserve all of your channels’ isolation and will bolster what it’s already doing rather than glue everything together in an undesirable way.
Beginners Guide Complete
Now you should be ready and able to start applying reverb in an efficient way. Sometimes, less is more!
Be aware of what’s happening in your mix, use aux and bus tracks, and don’t overload your mix with reverb! Be wary of your left and right panning, follow our tips and tricks and you’ll have that Mixxed loop sounding lush in no time!