How to Create Vintage Sounding Drums inside a DAW
First, it was the popularisation of Drum Machines in the early 80’s that had drummers quaking in their boots. But it’s the recent advancements in virtual sampled drum kits that should be giving drummers sleepless nights. For It is now possible to create realistic vintage sounding drums within the confines of a modern DAW.
VST’s such as Supreme Drummer 3 and Addictive Drums 2 offer a vast selection of different kits, all multi-sampled within an inch of their drum skins. Not only that but they also provide endless mic positioning, mixing and processing options. With all these tools at your disposal and a well-trained ear, it’s now possible to create pretty much any drum sound.
In this post, we will be focusing on how to create vintage-sounding drums from the confines of your DAW. This much-coveted sound can be heard in many modern styles of music with Its warmth and cosy charm providing an ideal foundation for your musical productions. So let’s take it back and start with a history lesson.
A Brief Historical Analysis of Drum Sounds
Since the birth of Rock and Roll in the 1950s the process of recording drums in popular music has been constantly developing. To recreate a vintage sound with your MIDI drums it’s important to study and understand different recording eras and styles. In this section, I will examine each decade and its approach to recording drums.

50s Drums
When we think about the drum sound of the 1950s we think about a very lofi almost muffled sound. Drums would have most likely been recorded with one overhead mic, often a ribbon mic, in the same room as the rest of the musicians. Multi-track recording was years away so studio engineers would make valiant efforts at sound isolation. The bleed and limited microphone placements would result in drum recordings that lacked definition while capturing the acoustic qualities of the recording space. Drum kits were also less ‘exciting” sounding and had a less resonant, almost dead sound. For instance, the trap on the snare was often much less pronounced.
60s Drums
While the early 60s represented a continuation of the 50s sound, as the decade progressed so did the engineer’s experimentation with multiple mic positioning. Bigger and better mixing consoles brought with them more input channels. Specific drums such as the snare or Kick may now be miked up separately allowing for more precise control over these sounds. Generally speaking, the tone of 60s drums features a dominant bias towards the mid-range. Snares started to feature more of a ringing trappy sound (not that sort of Trap!) Artificial reverbs, such as plate or spring were being used for the first time on drums. This provided more control over the spacial sound of the drums in a mix. By the late 60s with the advent of multitrack recording, engineers had much more control over drum isolation. This resulted in recordings with far more frequency and dynamic range. George Martins’s exquisite recordings of Ringo’s Kit on late 60s Beatles recordings stand as fine examples.
70s Drums
Many people regard the 1970s as the golden era of drum recording. Many Studios now offered multitrack recording with ever larger mixing desks. This resulted in drum recordings that were more warm and characterful in nature.
While compression had been around since the 60s engineers now used it on the individual drum channels to sculpt the sound of each drum element. This often resulted in a much punchier sound that would really cut through in a mix. Because of Compression and EQ techniques, drummers no longer had to thrash their kits and could now play in a gentler more controlled manner.
Different musical styles would each have a distinct drum sound. For example, the rise of disco in the 70s relied heavily on an impactful punchy drum sound. Reggae drums would famously be drenched in spring reverb and feature the creative use of tape delays. While in the world of Rock the heavy yet beautifully balanced drums of John Bonham from Led Zeppelin are often lorded as the pinnacle and benchmark of drum recording.
80s Drums
While the sound of 70s drums was largely rich and warm, the 80s saw a move towards a more heavily processed industrial sound. This could have had something to do with the fact that drummers were going head to head with a new enemy – The Drum Machine. The drum sound and even playing of the time seemed to want to emulate the mechanical feel of drum machines such as the infamous Linn Drum.
One of the classic studio techniques popularised in the early to mid-80s was that of gated reverb. Gated reverb involved applying a reverb effect to the drums, then abruptly cutting it off using a noise gate. This technique created a distinctive, explosive sound characterized by a quick, punchy decay. While the history books haven’t been so kind on the highly recognisable and synonymous 80s drum sound, in recent years it has been making a comeback in the form of Vapor Wave and Synth Wave music.

Vintage Drum Kit Selection
So, we’ve looked at the various eras and the associated drum sounds. Now it’s time to focus on the important aspect of selecting the right kit for the job. When attempting to emulate vintage-sounding drums it’s important to select the sort of kits that would have been widely used during the era you’re going for. Luckily you can find multi-sampled versions of almost every classic kit and drum made. The key here is to do your research. Find out the sort of kits that were used in your favourite vintage recordings and search out their virtual equivalent. To get you started here is a quick list of some iconic vintage drums.
Classic Vintage Kits
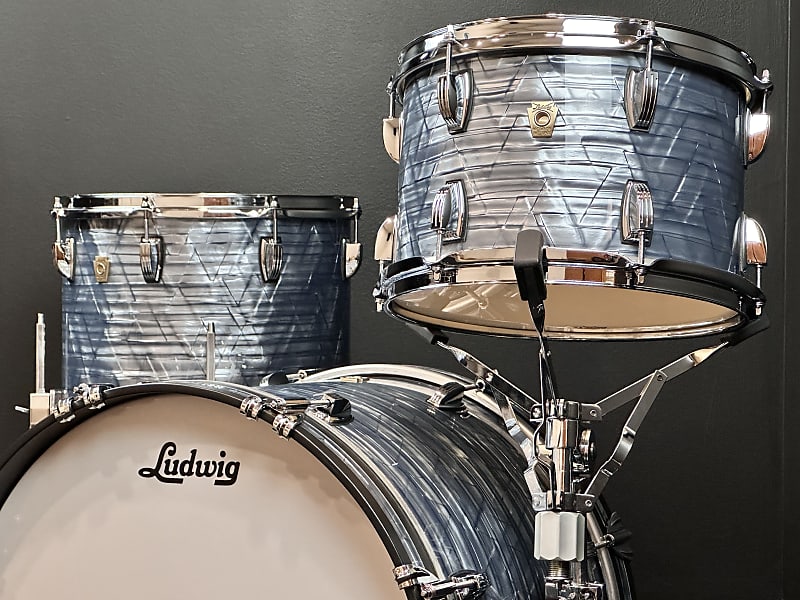
Ludwig Super Classic: This 1960s kit gained fame through Ringo Starr of The Beatles. Its distinctive black oyster pearl finish became synonymous with the band’s early sound and look.
Gretsch Round Badge: Used by drummers like Elvin Jones (John Coltrane’s drummer) and famously associated with rock ‘n’ roll and jazz music of the late ’50s and ’60s, this kit had a warm tone and classic design.
Slingerland Rolling Bomber: With its innovative design and versatile sound, this kit was used by drummers like Buddy Rich and was recognized for its quality construction and tonal range.
Pearl Drums Fiberglass Series: These drums gained popularity in the ’70s due to their durable construction and punchy, bright sound. Drummers like Ian Paice of Deep Purple contributed to their fame by using this series.
Ludwig Vistalite: Made of acrylic, these drums had a distinctive look and a powerful, resonant sound. John Bonham of Led Zeppelin famously used a clear Vistalite kit, contributing to its iconic status.
Gretsch Stop Sign Badge: This series, particularly the Gretsch ‘Stop Sign Badge’ drums, gained attention for their warm tone and quality craftsmanship. They were favoured by drummers like Phil Collins and Bill Bruford during the ’70s and early 80s.
Ludwig ‘Downbeat’ Kit: This iconic 60s kit was used in a lot of famous R&B recordings. With its tight punchy sound, it would go on to feature in many classic funk records. Most famously it was the kit of choice of James Brown drummer Clyde Stubblefield.
Drum Programming
So now for the crucial part…programming your virtual MIDI drum kit. It goes without saying that the most important aspect is to make the drums sound as though they are being played live. Luckily, there are various tricks and techniques that can be used to inject a humanised feel into your drum programming.
Finger Drumming
Rule number one is rigid quantisation should be avoided. If you are a proficient finger drummer then try playing in the midi live to a click and not quantising the result. You don’t have to do it in one hit and could add each drum part separately. If you play a few duff hits then its easy with MIDI to go in and nudge them back into the groove.
Swing
If your live finger drumming skills are not so hot then your next option is to add swing. Most DAWs come with a preloaded set of swing templates. First program in your drums quantising them to the appropriate quantisation value. Then you can simply apply different swings and swing percentages to inject a sense of groove. It’s amazing what just a small amount of swing can do. For instance 52% swing on 16th notes. Once the swing is applied you can still experiment by nudging certain notes back and forth.
Groove Capture
If you want to try and replicate a more specific drum style or performance you can actually capture the groove using a groove capture tool. First find a drum recording that features the sort of feel you are going for. Finding isolated drum parts can be tricky but luckily with stem separation tools, you can easily extract and isolated drums from anything. Now for the fun bit! Most DAWs have a function whereby you can use your isolated rhythmic audio source and extract a groove template from it. This can then be applied to your MIDI drum programming.
Some DAWs such as Ableton Live offer a drum-to-MIDI function which will attempt to translate your drum audio source directly into MIDI. It attempts to identify the kicks, snares and hats from the audio and write it as MIDI. In reality, it rarely identifies all the correct elements and you will probably have to go in and delete some rogue MIDI notes. Once you’re done apply the generated MIDI to your Drum VST channel and ‘BINGO’, you should have some pretty natural-sounding drums.
Note*, If you use any of these MIDI extraction techniques bear in mind it’s important to first get your drum audio source sitting on the grid. Try not to warp the audio so that it sits too snuggly to the grid as this will defeat the object of providing subtle natural timing. I would recommend getting the first kicks of each bar to sit perfectly on the grid or at the most the kick & snare.
Velocity
But it’s not just the timing of your drums that helps to sell the illusion of reality. The drum velocities also play an important part. Most drum VSTs will offer different velocities for each drum element. Make good use of the different velocities. try to emulate the way a drummer would hit the skins. For example, very light snare hits applied in the right places can sound ace. And if you cluster 2 or 3 of these tightly together it can produce a nice roll. Experiment with different velocities using your ears as a guide. If something sticks out and sounds unnatural then go in and adjust the velocities of those hits.
Vintage Sounding Drum Processing Techniques
So you’re halfway there having laid down some funky MIDI grooves. The other piece to the puzzle lies in the processing of your drums. To emulate vintage sounding drums you will have to apply a variety of processing techniques. Generally speaking, Vintage drum recordings were not at all clean and clinical. They would have been recorded onto tape through noisy analogue outboard gear and mixing consoles. This gave them a highly saturated sound. Basically the polar opposite to the clean precise digital medium of a DAW. For this reason, when attempting to recreate vintage sounding drums you can be fairly generous with the amount of processing applied. So let’s go through the main types of processing you will want to deploy.
Saturation
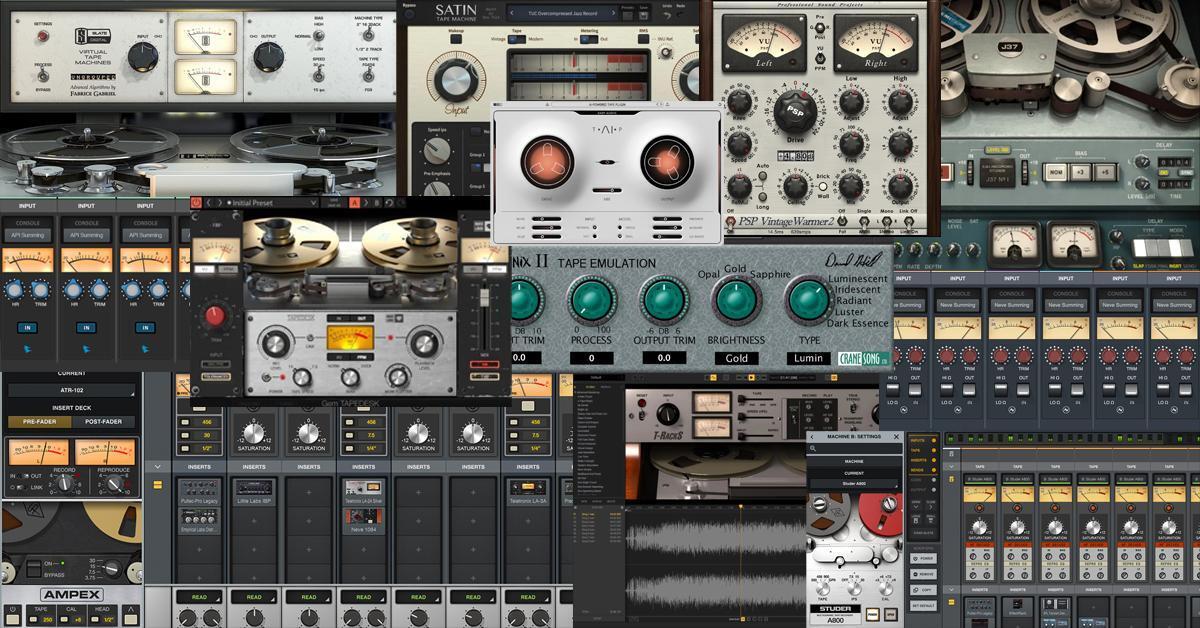
Saturation refers to the deliberate distortion or clipping of audio signals, adding harmonics and warmth to the sound. Numerous plugins are available that aim to model analogue equipment. Tape and tube saturation are the two most modelled forms of saturation. when emulating vintage sounding drums feel free to experiment with different settings and saturation amounts. Depending on the drum sound you’re going for try adding saturation until you start to hear some audible distortion. Then pull the levels back a little so you get maximum colouration without any obvious distortion. You could also try adding more than one instance of saturation. For instance some tube and tape saturation.
Vinyl emulator plugins are another fantastic form of saturation. Plugins such as Abbey Road Vinyl from Waves or the Free to Download Vinyl from Izotope are perfect for emulating vintage sounding drums.
EQ & Compression
EQ and Compression are your next stop. While it’s not essential, if you have them in your arsenal, try to pull up EQ and Compression plugins that are modelled on vintage units. Some classic EQs are the Pultec EQP-1A and the Neve 1073 EQ. While the Teletronix LA-2A and Urei 1176 are fantastic vintage compressors.
To achieve a vintage drum sound, try applying moderate compression with a slower attack and faster release, aiming to subtly even out the drum hits while allowing the transients to punch through.
When it comes to EQing it’s important to analyse reference sources. Set up a track alongside your MIDI drums and drag in a recording of the type of vintage drum sound you want to achieve. Regularly A & B between the two channels trying to match the EQ characteristics of the vintage recording. As a rule of thumb the older the vintage recording the more restricted the high and low frequencies will be. Therefore you should make good use of High and Low pass filters.
For the ultimate in EQ modelling, several EQ plugins such as fabfilters EQ2 and EQ3 offer an EQ match facility. These tools allow you to feed in some reference audio. It will then analyse the EQ curve of the reference and apply it to your drum channel.
Reverb
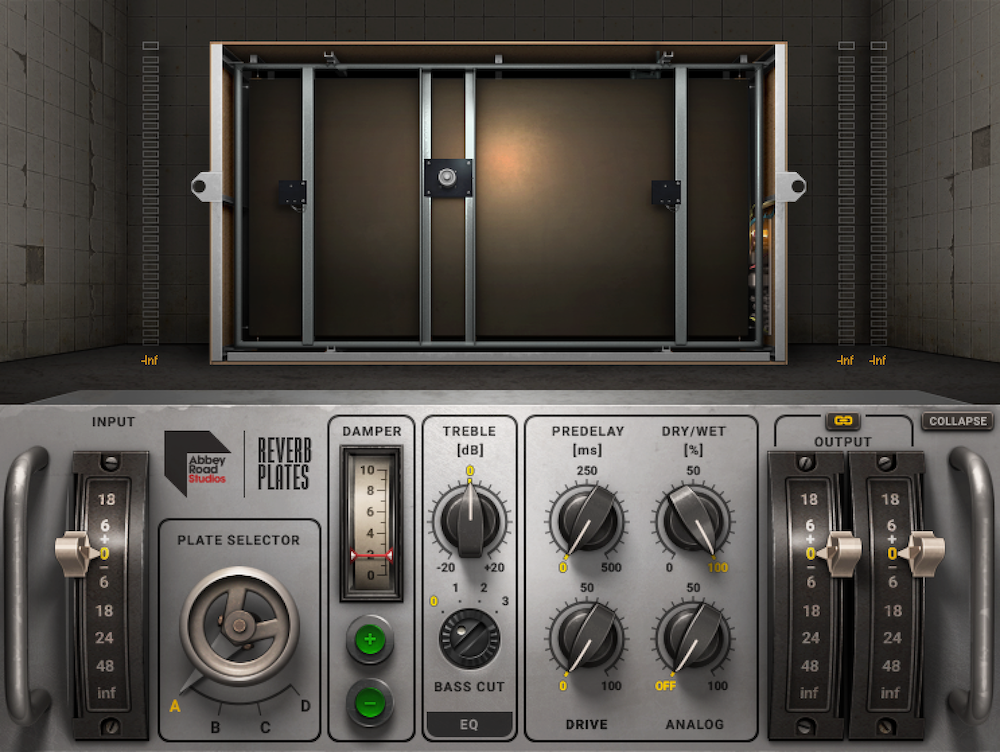
And finally, we move on to the very important role of reverb in creating vintage sounding drums. During the ’60s and ’70s, two primary reverbs prevailed: Plates and Springs. Plates, popular for their artificial spatial simulation, imparted a bright, metallic quality, ideal for enhancing drum textures. Conversely, Springs, although commonly associated with guitars and organs, often found their way onto drum tracks. Genres like ’60s garage, psych rock, and most famously Reggae, all featured spring-laden drum tracks.
So when trying to emulate vintage sounding drums in a DAW look for plugins that model these types of reverb units. The Vintage Verb by Valhalla is a popular choice as it offers a variety of plates as well as selectable 60’s 70s and 80s colouration. Again much like EQ and Compression use vintage recordings as inspiration as to the amount of reverb to apply. Try applying varying amounts to the different drum elements. As a rule, the snare can accommodate the most reverb while the kick drum generally remains dryer in nature.
Summary
I have attempted to cover the main aspects of creating and mixing vintage sounding drums in a DAW. Of course the huge variation in drum styles and sounds over the past 80 years or so makes it impossible to cover everything. The main thing is to study the subtle nuances of vintage drum sounds yourself. Using references is key here.
Most of us have spent our production careers trying to make things sound as clean and polished as possible. It can therefore feel somewhat counterintuitive to do the opposite in order to capture a more vintage sound where imperfection is its very charm. Just don’t be scared to push the envelope. By Putting those drum VSTs through their paces and piling on the processing you should be able to get some pretty cool and convincing results.
Remember – RouteNote Create subscriptions start from as little as $2.99. You also get 10 FREE credits to spend on samples along with access to our FREE sample pack bundle when you sign-up!