
How to Set your Mastering Levels
One fundamental yet often overlooked element of audio mixing is that of setting the correct mastering levels for your mix. It’s a crucial aspect that can make or break the quality of your productions. In this guide, we’ll cover the basics of what levels are, the difference between levels and volume, and introduce you to essential terms and best practices to kickstart your understanding.
What are Levels?
Audio levels, in simple terms, refer to the intensity of the sound. Think of it as the height of the waves in your music. Properly setting these levels ensures each instrument can be heard clearly, creating a balanced and polished mix.
Levels vs. Volume
Now, let’s clear up a common misconception. Levels and volume are related but distinct. Volume is the overall loudness of your track, while levels focus on the individual intensity of each instrument or group of instruments. Balancing these levels effectively contributes to a mix that’s not only loud but also clear and dynamic.
Key Terms.
– Peak
The peak level represents the highest point of intensity in your audio. It’s crucial to prevent distortion and ensure your music retains clarity.
– PPM (Peak Program Meter)
PPM is a metering tool that helps you monitor peak levels. Keep an eye on it to avoid exceeding the maximum intensity your system can handle.
– dB (Decibels)
Decibels are the unit of measurement for sound intensity. They are the standard measurement of volume in audio. Understanding dB helps you gauge the loudness of different elements in your mix.
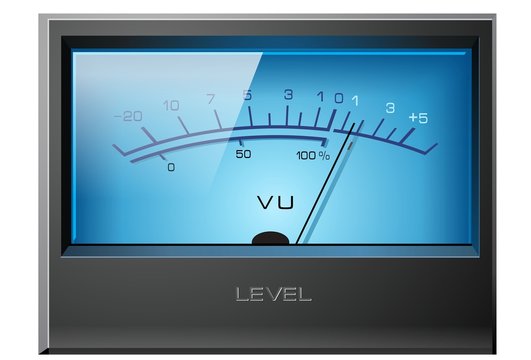
– VU (Volume Unit)
Volume Units (VU) serve as a unique measurement in audio, focusing not on the instantaneous levels but rather on the way we perceive the volume. The essence lies in averaging the overall auditory experience.
Distinguishing itself from peak measurements, VU readings offer a distinct perspective. VU meters are used to help you monitor the volume units i.e. average audio levels. Use them to ensure a consistent intensity throughout your track.
– RMS (Root Mean Square)
RMS levels provide insight into the overall loudness of your mix. Like Volume Units RMS is concerned with the way we perceive loudness. It can be very useful in achieving a balanced and well-rounded sound.
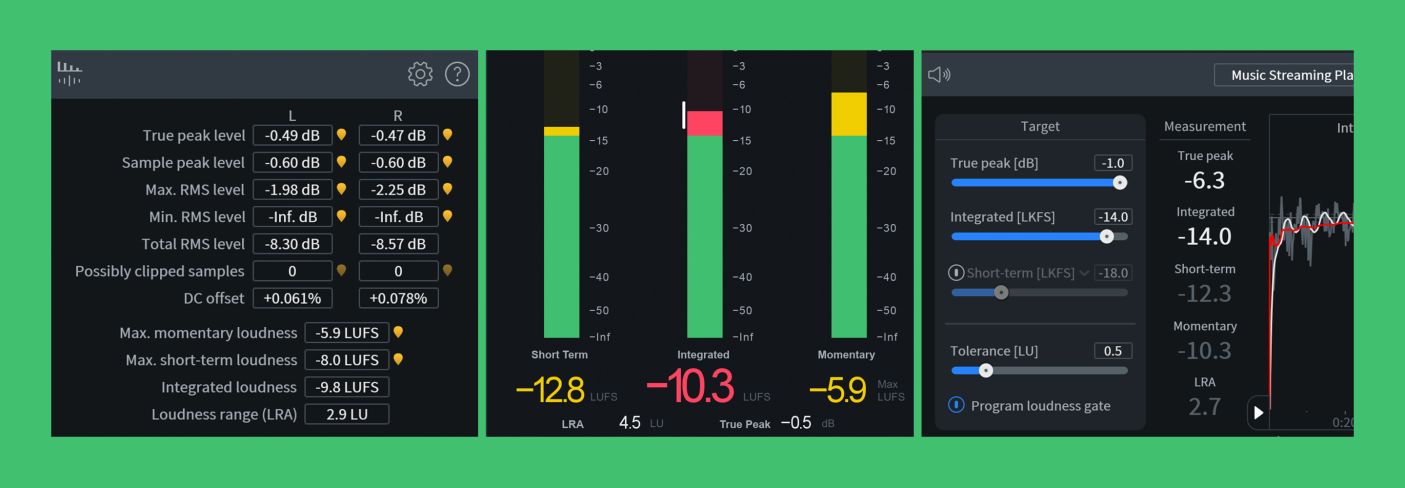
– LUFS (Loudness Units Full Scale)
LUFS are a fairly new form of loudness measurement. They help measure loudness in a standardized way, ensuring consistency across various playback systems such as streaming services. Some believe this measurement was devised to help combat the so-called Loudness Wars. For a more detailed explanation of LUFs check out this blog.
Preparing and Setting Levels Pre-Mastering.
Now that we’ve established the foundational knowledge of levels, let’s delve into practical techniques to help you master the art of setting levels in your music productions.
Before reaching the mastering stage, it’s crucial to ensure optimal levels during recording and mixing. Pay attention to the input levels while recording each instrument, avoiding distortion and maintaining clarity. During mixing, use techniques like gain staging to balance the levels of individual tracks, setting the stage for a well-mixed audio.
If you are preparing a mix for mastering it is crucial that you leave enough headroom. Headroom is the space between the highest peak of your audio and 0 dB. It’s crucial for preventing distortion during mastering. Typically, leaving 3 – 6dB of headroom will be enough room for a mastering engineer to master a track.
Essential Tips for Successful Mastering
Three Essential Tools
Simplicity is key in mastering. Begin with three fundamental tools: EQ, compression, and limiting. These tools allow you to shape the tonal balance, control dynamics and set the overall loudness level of your master.
Trust Your Ears
While technical specifications are essential, never underestimate the power of your ears. Listen critically to your mix on various playback systems to identify inconsistencies or issues. Trusting your instincts as a producer or engineer is key to achieving a satisfying final product.
Metering Tools
OK, I know I just said trust your ears but metering tools are also indispensable in mastering. Acquire a reliable meter to measure levels accurately. Starting with a meter helps set the initial levels, especially focusing on the peak levels and ensuring they align with industry standards.
Use Reference Tracks
Comparing your mix to professionally mastered tracks in the same genre can provide valuable insights. Pay attention to the balance of frequencies, dynamics, and overall tonal quality. This practice helps you set realistic goals for your own mastering process.
Dynamic Range Matters
Maintain a healthy dynamic range in your master. While some genres benefit from a more compressed sound, preserving dynamics can add depth and musicality. Strike a balance that suits the style of music you’re working on.
Setting Levels with Limiting
One effective strategy is to set levels first with limiting. This involves using a limiter to control the peak levels, preventing distortion while maximizing loudness. Carefully adjust the limiter settings to strike the right balance between impact and clarity. There are many plugins to assist in this. Ultramaximiser by Waves is a popular choice.
Mastering Levels for Different Scenarios
To achieve professional results, it’s crucial to understand the recommended mastering levels for various distribution scenarios. Let’s delve into the optimal levels for the 3 most common scenarios.
4.1 Streaming Platforms
Streaming services, such as Spotify and Apple Music, have specific loudness standards to ensure a consistent listening experience. Aim for a loudness level around -14 LUFS (Loudness Units Full Scale) for these platforms. This allows your music to sound cohesive with the overall streaming library.
4.2 Downloads
When preparing your music for MP3/WAV downloads, consider a slightly higher loudness level compared to streaming. Target a range between -12 to -10 LUFS for MP3 files. This ensures a good balance between clarity and impact, enhancing the listening experience for those who prefer downloading music.
4.3 Vinyl
Vinyl mastering requires a different approach due to the physical constraints of the medium. Keep the peak levels conservative to avoid distortion during the cutting process. Aim for peak levels around -1 dB and a more dynamic overall mix. Bare in mind you are preparing your master for a cutting engineer who will further optimise your track for the vinyl format.

Summary
I do hope this post has helped shed some light on the sometimes confusing area of loudness and levels within mixing. Paying close attention to the levels of both your track elements and the overall mix is a crucial part of crafting a professional-sounding production.
So until next time, stay out of the reds and keep those meters happy.
Remember – RouteNote Create subscriptions start from as little as $2.99. You also get 10 FREE credits to spend on samples along with access to our FREE sample pack bundle when you sign-up!