
The BEST Stem Separator yet – And it’s FREE
In recent years the term Stem Separator has become somewhat of a buzzword in Music production. New Stem Separators seem to spring up every month offering more and more sophisticated features. For example, DJ software is now integrating real-time stem separation into its software.
But despite all the promises the reality is often rather disappointing. Separated stems often sound little better than a 64Kbps MP3 file, complete with phased artefacts, bleeding and the odd glitch for good measure. While the holy grail of perfect quality separation may be a way off we think we’ve found the closest contender yet – AND ITS FREE!!!! Enter Ultimate Vocal Remover 5.
In this walkthrough, we will be guiding you through the many features and processes of Ultimate Vocal Remover 5. So if you need to conjure up a usable acapella or Instrumental stay tuned as this may well be the guide you’ve been looking for!
What is a Stem Separator?
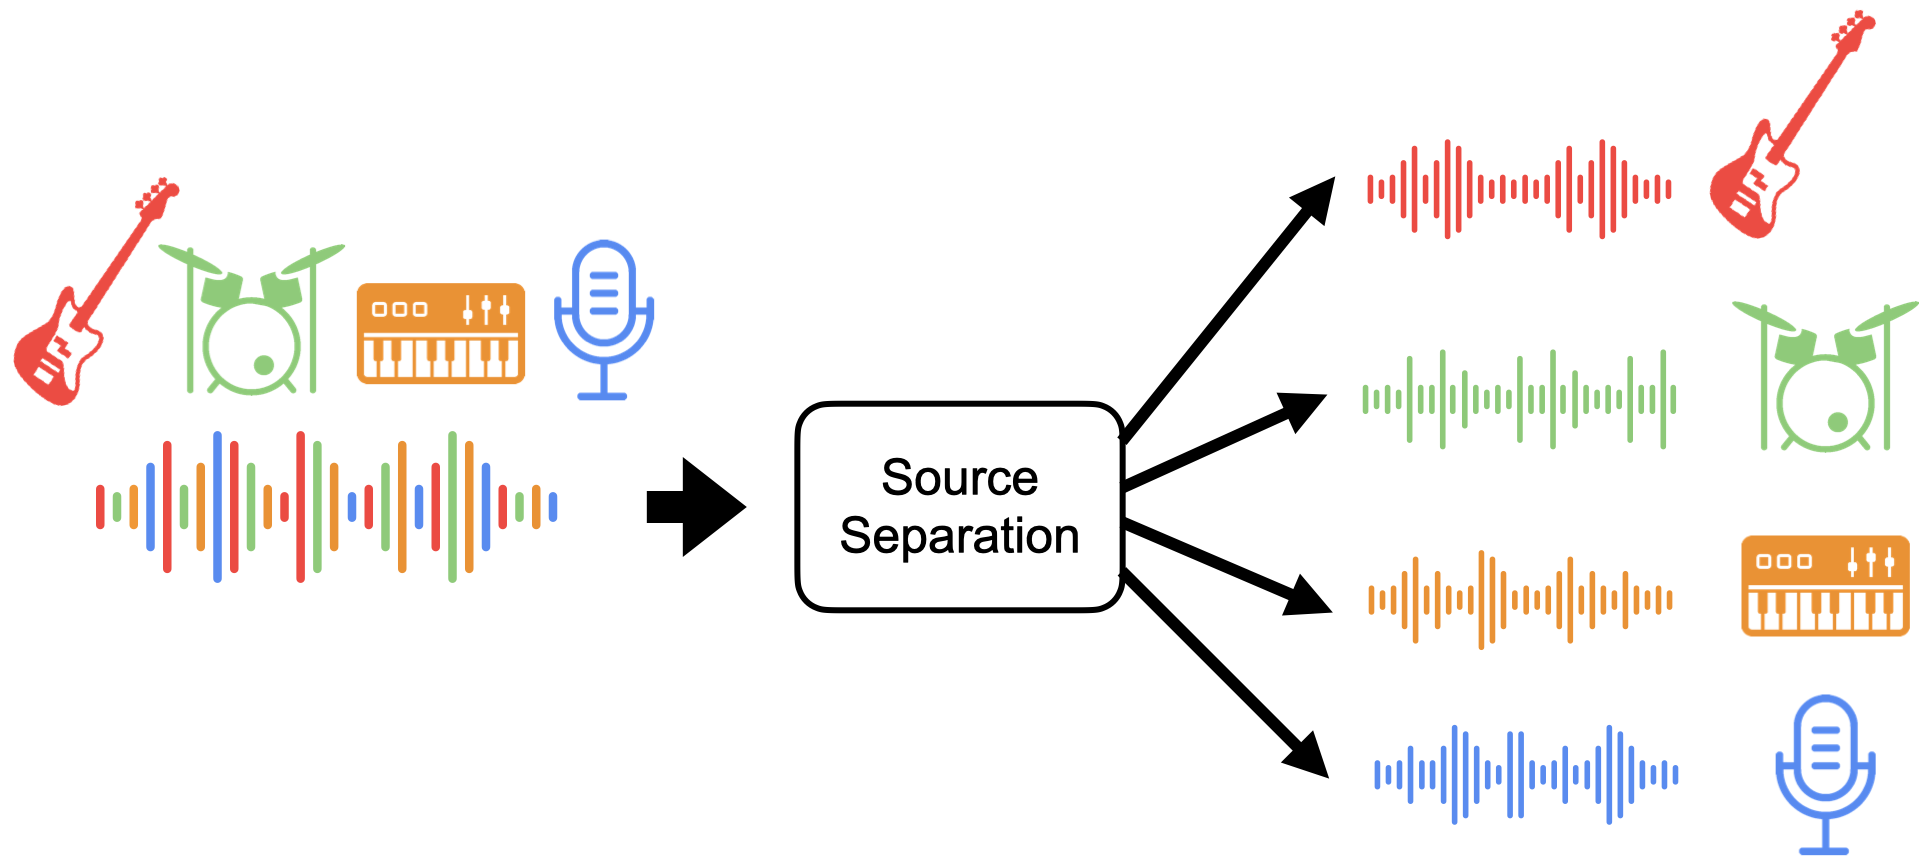
Stem separation is the process of isolating and extracting individual components or tracks from a mixed audio recording. In a typical music track, different elements such as vocals, drums, bass, and various instruments are combined into a single mix. Stem separation technology allows for the separation of these elements, making it possible to adjust or manipulate them independently. This technique provides musicians, producers, and DJs with greater creative control over their music, enabling you to remix, re-mixing, and reimagine songs in unique ways.
Ultimate Vocal Remover 5 Stem Separator – An Overview
Ultimate Vocal Remover is an open-source application available for free on the internet. When originally launched Ultimate Vocal Remover only offered Vocal stem separation hence the name. Now in its 5th incarnation, UVR5 now supports the separation of Drums and Bass as well as the rather mysterious sounding ‘Other’. Through the power of AI (Sorry I had to mention it at some point) UVR5 offers some of the best stem separation currently available. It utilises a sophisticated and customisable system of Learnt models and can even combine different models and create ensemble composites. I realise that sounds rather complicated but bear with me and will attempt to explain.
In this guide I will walk you through everything you will need to know to get started on your stem-extracting journey. Starting at the beginning – Installing the software.
Downloading and Installing
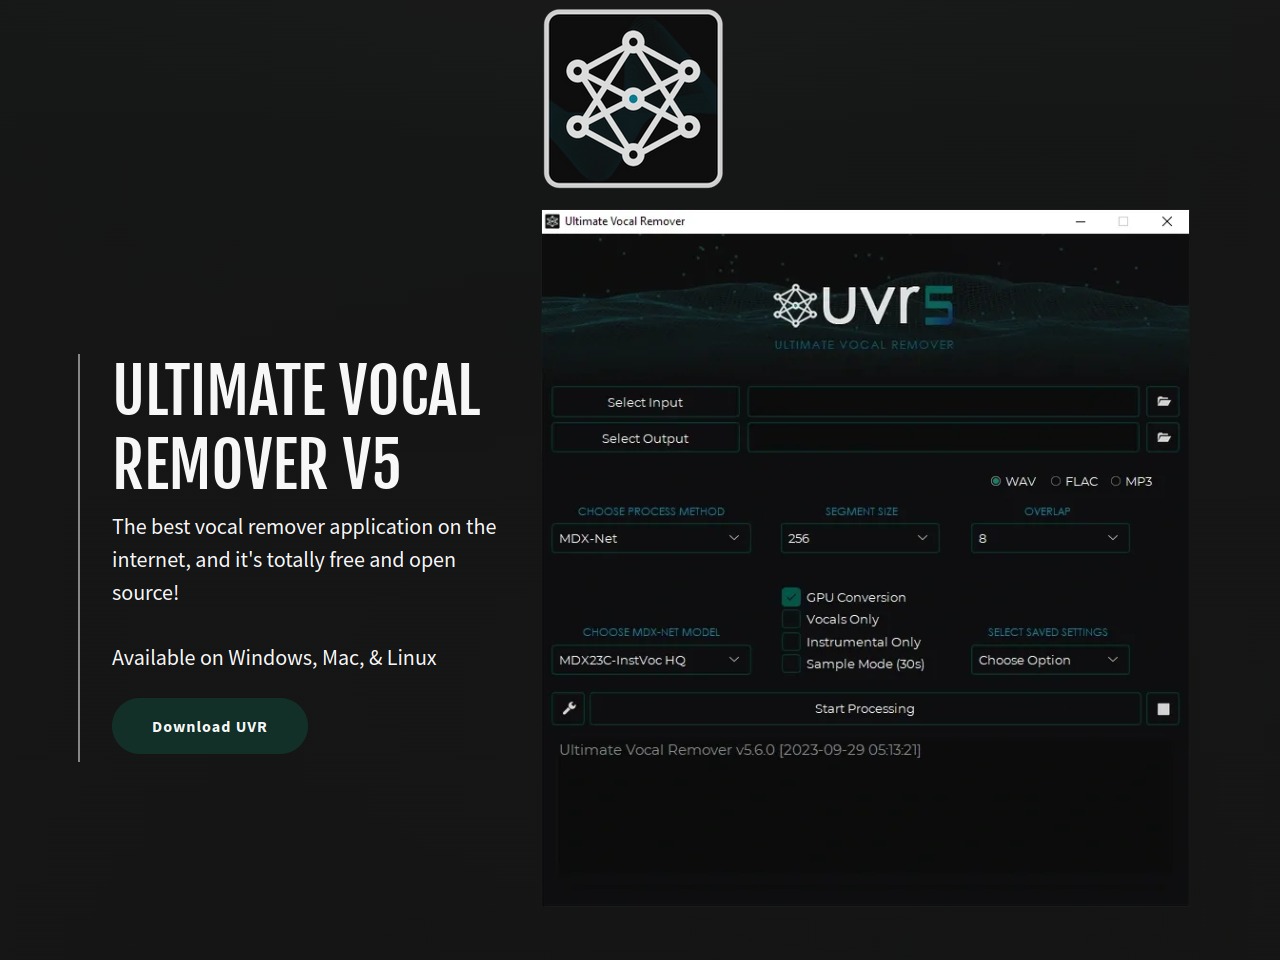
Unlike browser-based Stem Separation tools, UVR5 is a stand-alone application that needs to be downloaded. Click the following link to take you to the Ultimate Vocal Remover page.
Next click on the Download UVR button. This will take you to a dedicated Github page where you have various download options. To get started just select the Main Download Link for your computer i.e Mac or P.C. Once downloaded follow the simple instructions to install the application. Once installed you’re ready to get your stem on!
Step-By-Step Instructions
So you’re all installed and raring to Stem. While UVR5 is a free-to-use application that offers top-notch extraction the downside is it may not be the most intuitive to use. This is not necessarily a negative though as the added level of features provides much more control over your results. So let’s walk through all the features starting with your file destinations.
1. Selecting Input and Output
This bit is simple. Just select the audio file that you would like to perform your stem separation on in the ‘Select Input’ field Then designate where you would like the stem separation files to go in the ‘Select Output’ field.

2. Processing Method
Here you get to select the processing method. The processing method is directly linked to the various models available (more on models later) Under Choose Process Model You have the following options: VR Architecture, MDX-net, Demucs, Ensemble and Audio Tools. Full disclosure time: I’m not going to pretend to know exactly what VR Architecture or MDX-net mean. I can however assure you that you don’t have to understand what they mean either to get good results from this tool.
The thing that separates this stem separator from the rest is its ability to use various trained models and algorithms to create a composite featuring the best results. This is done by selecting Ensemble mode. For this guide, I will be concentrating solely on Ensemble mode. So if you are following along at home then Ensemble Mode is the processing Method you will want to select.

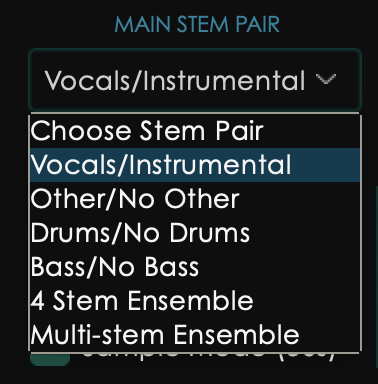
3. Stem Pairing
If you have selected Ensemble Mode the next field along is ‘Main Stem Pair‘. Here you get to choose what stem parts you wish to separate. You have the following options: Choose Stem Pair, Vocals/Instrumental, Other/No Other, Drums/No Drums, Bass/No Bass and 4 Stem Ensemble. These are fairly self-explanatory so decide on what pair of stems you would like to separate, ticking the appropriate box.
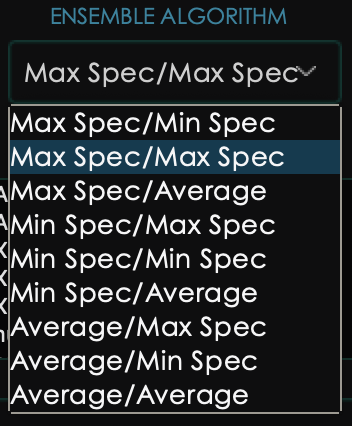
4. Choosing your Algorithm
This next field allows you to select the quality of the stem processing. There are various options available here. While I would suggest using Max Spec/Max Spec it could be worth experimenting with other combinations. I ran a few tests on the same piece of music using the same models and found advantages and disadvantages to each quality setting and combination. For instance, while the Max Spec offered a slightly higher quality result, particularly on the instrumental, there was slightly more bleeding in places. Also, the vocals, while more Hi-Fi in quality seemed to have a high frequency sizzling. Some targeted EQing or noise reduction may help to alleviate this.
5. Extra Options
Before we get to the crucial models field we have a couple of other fields to look at. If you have selected Ensemble Mode you will see a field called Ensemble Options. From here you can either Save your Ensemble model selections. This could prove a useful feature if you happen upon a winning combination of models and want to save this combination for future use. You can also clear your selected models from here.
Note. If you select a different process method i.e. VR Architecture this field as well as all the other fields will change. I have experimented with some of the other individual process methods and the results were not as good as Ensemble Mode hence focusing on this process.
Just to the right of Ensemble Options, you will find a list of 4 additional options. At the top of the list you have GPU Conversion. If your computer has a powerful GPU you will have the option to select this button. It will then draw on your GPU’s power rather than your CPU. This may help to speed up the processing time.
You then have the option of selecting an individual stem rather than a pair. i.e. just a vocal stem file rather than the vocal and instrumental files.
And finally, you have a rather useful option to just generate a 30-second sample snippet. This is handy when experimenting with different model combinations and algorithmic settings as it cuts down the amount of time it takes to process the separation. Once you get a good result simply unselect Sample Mode (30s) and process the full audio file.
6. The All-Important Models
Now for the clever part. UVR5 offers users the opportunity to custom-tune the Stem Separation algorithms. To do this various models are available to insert and select in the Available Models section. These various models have used machine learning and AI to train themselves to recognise what certain isolated elements should sound like i.e Vocals, Drums etc.
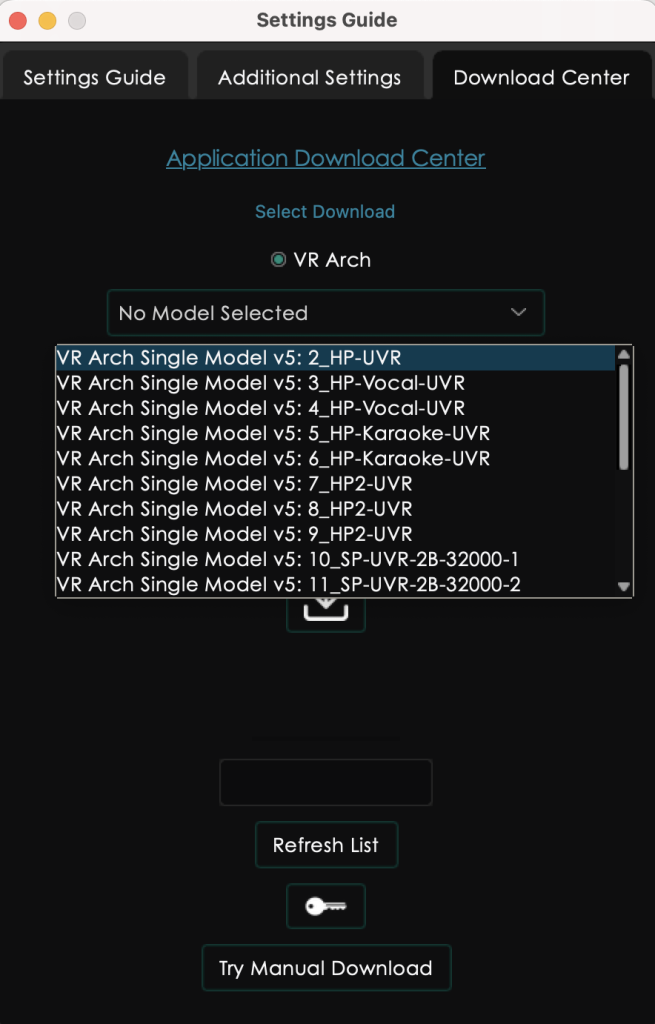
If you have just downloaded UVR5 you may only see a few in there. You will need to download new models separately. To browse and select new models you need to press the spanner to the right of the Start Processing button. This will bring up Settings Guide. From here click on the Download Centre tab. You can then click on one of the 3 processing Methods and select a model from the drop-down list. Click the Download icon button and Bingo! Note, you can only seem to download one at a time.
The downloaded model will then automatically appear in the Available Models list on the main page. So, to start just select a few models. I would suggest 2 to 4 different models.
Now, I know what you’re thinking. How do I know which models to choose? What does each model do and which ones are the best? Well, I’m afraid I don’t have the golden answer here. I’ve just started to experiment with the various models myself and haven’t tried them all out – yet. Luckily the user community are here to help when it comes to this. (Read on for more details).
OK, so now you have all the fields filled in it’s the moment of truth. Let’s get separated!
7. Let the Processing Begin
This one is pretty self-explanatory. Once you are happy with all your selections simply press Start Processing and guess what… It will start processing your audio. As it processes you will see a percentage done counter. I have been testing this on an M1 Mac and the processing speeds have been fairly quick. Less powerful computers will have slower processing times. The processing time is also very much determined by the length of the audio and the quality settings applied in Ensemble Algorithm.
Results
If using Ensemble Mode you will get both the Ensemble stem separated files as well as all the separate model separation. The model separation files will be housed in a separate folder. The folder will be called Ensemble_Outputs along with a reference number. You should check out all the different files and assess which ones have returned the best results.
Here’s my top tip based on my limited experimentation with UVR5. While applying too many different models can result in a poor ensemble separation, it can be useful for assessing various models at once as they are all provided in the Ensemble Output folder. Try applying 5 or more models. Then assess which individual models have worked best. Then re-process using just the 2 or 3 best-sounding models. Your composite ensemble should then represent the best elements of the best models. BINGO!
While I have taken you through all the steps necessary to stem separate using Ensemble mode I highly recommend checking out this excellent UVR5 demonstration video from Soundlearn
Calling on the UVR community
If you don’t feel inspired to experiment with the myriad of different models and settings available then fear not, the UVR5 user community are here to help. Several online forums have sprouted up where users share intel on the best model/setting combinations. https://github.com/Anjok07/ultimatevocalremovergui/discussions is one such hub where various UVR5 topics are discussed. https://audiosex.pro/threads/ultimate-vocal-remover-5-best-settings-for-best-results.71505/ is another.
I suggest spending some time perusing the various threads in search of Ultimate Stem Separator Enlightenment!
Conclusion
OK, so UVR5 is not perfect. No stem seperator is! But, as someone who has tried most of the alternatives out there and is fairly obsessed with stem separation technology, I can honestly say UVR5 is up there as one of the best. And let’s not forget, it’s Totally FREE!!!!
In the limited time I have had using UVR5 I have obtained some truly awesome separations, particularly in the realm of vocals. It has also generated some stinkers but this is largely due to testing various models and settings. Getting the best results will undoubtedly involve a level of experimentation and research on the forums. But that’s what I love about this tool. I welcome the fact that UVR5 offers so much customisation. And let’s not ignore the fact that as this is Open Source and the models are constantly being trained using machine learning. Therefore the quality and accuracy of the separation should always be improving.
So, if you are on the hunt for a highly versatile stem separation tool and like the idea of paying no money (Unless you would like to donate) then look no further. Ultimate Vocal Remover 5 is a bonafide ‘No Brainer’ and I cannot recommend it enough. Anjok07 (The developer of UVR5) I salute you.
Remember – RouteNote Create subscriptions start from as little as $2.99. You also get 10 FREE credits to spend on samples along with access to our FREE sample pack bundle when you sign-up!