Compression Explained: How Do Compressors Work?
What is Compression in Music Production?
Compression is used to control the dynamic range of an audio signal. Maybe you wanted to change the dynamic range of a loop you’ve made with Mixxed samples? Well, we’re going to show you how!
Dynamic range is the difference between the highest and lowest levels of amplitude in any given signal. So, you’re reducing the difference between the highest and lowest levels by lowering the highest points and maintaining the lower volume points to maintain a consistent level across an entire audio signal.
In music production, we can use compression to do a few things, but we’re going to cover that later. We’ll also cover the different types of compressors in good time!
You’ve made some killer sounds through our Define Synthesis series, but need to tame crazy transience? Let’s focus on the compression basics and ease ourselves into this wormhole of information!
Explain Compression
5 Types of Compression and When to Use Them
What is Compression Used For?
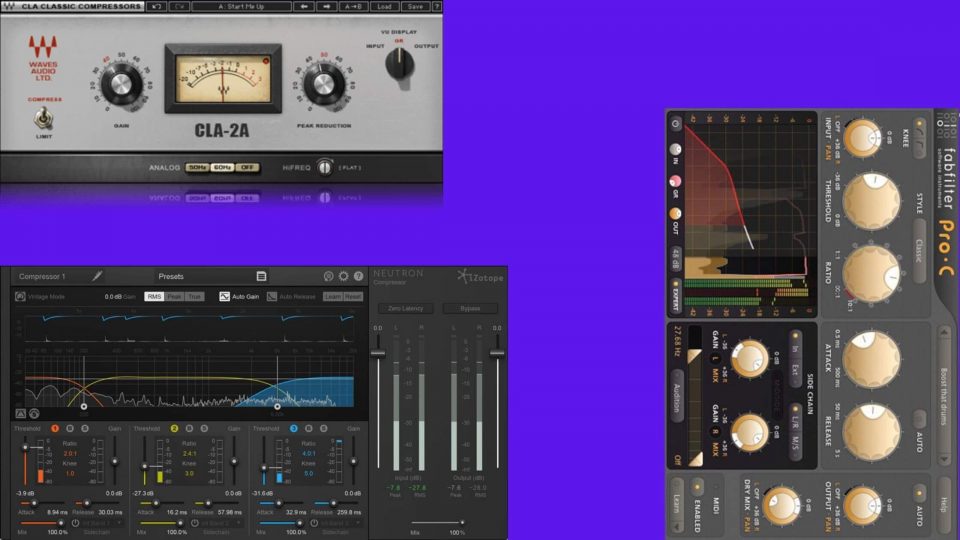
What are the Different Types of Compressors?
Top 5 Compressor Plugins to Help You Control Dynamics
What Does Threshold do in Compression?
What is the threshold in audio compression? A threshold is an amplitude you want your signal to reach before your compressor engages.
For example, if you wanted your input to reach 10dB before the compressor kicks in, the threshold is how you set that parameter. The threshold tells your compressor “yep, this is loud enough now” and your compressor brings the volume down, which reduces the dynamic range of the signal.
If your signal doesn’t reach the amplitude at which you have set your threshold, the compressor will continue to sleep. On the flip side, if your signal is consistently above the threshold, your compressor won’t sleep at all!
As your signal begins to drop below the set threshold, your compressor disengages.
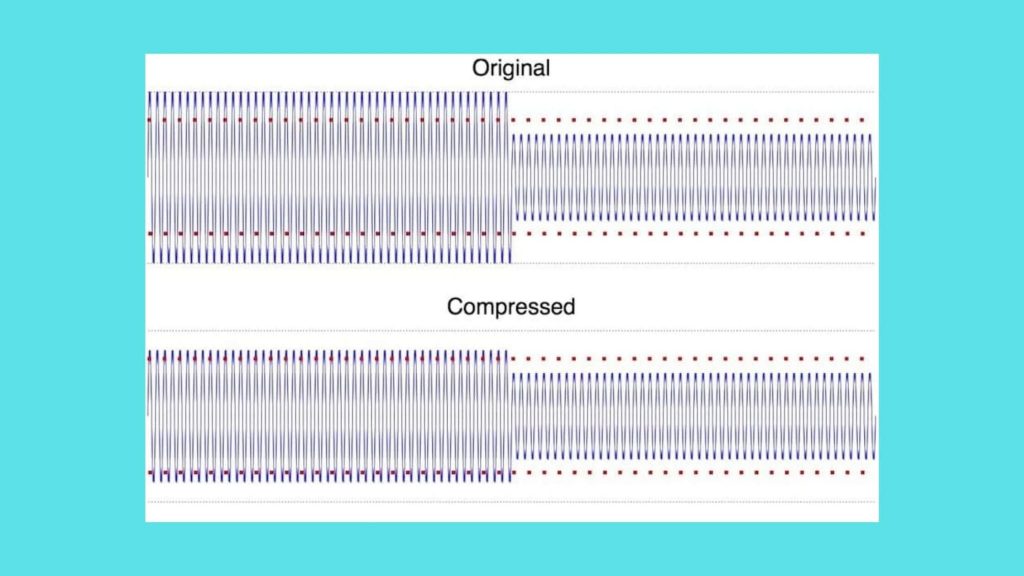
Let’s jump in with a visual example.
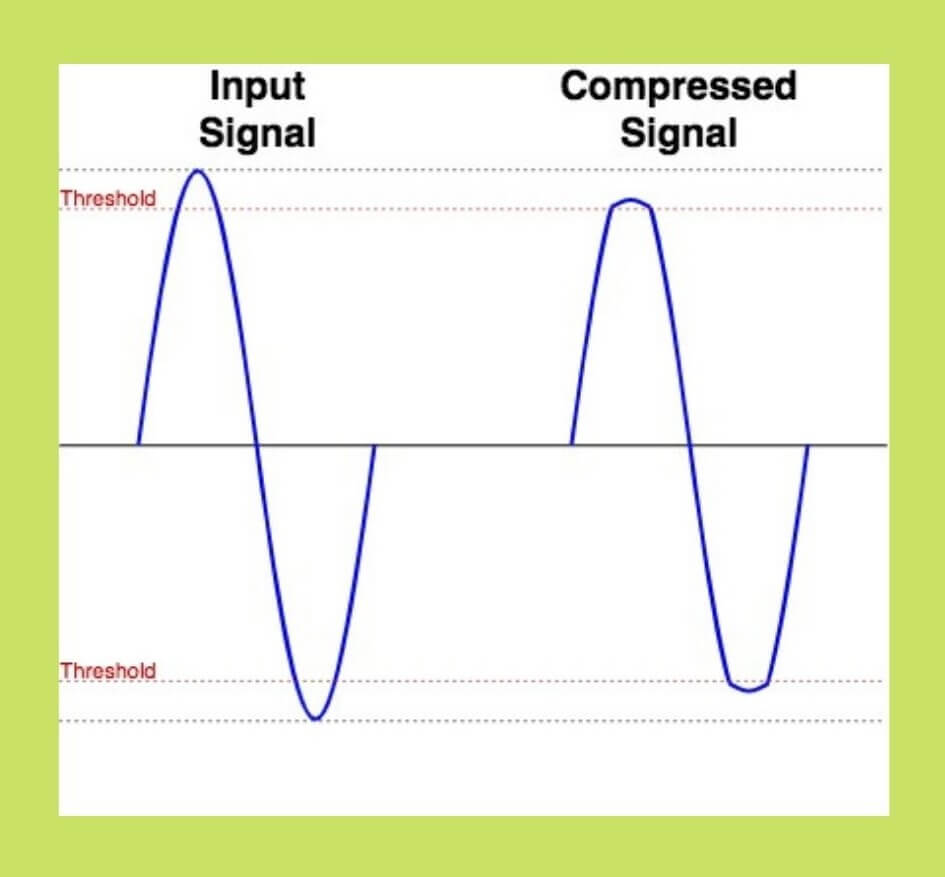
Above is a representation of an audio signal and threshold markers.
The red dotted line is your threshold settings, time is represented along the x-axis & amplitude on the y-axis.
When you compare the original signal against the compressed signal, you can see that the amplitude is only attenuated in the segment of audio that crosses over the red dotted line/threshold.
If you’re still not entirely confident, here’s another example.
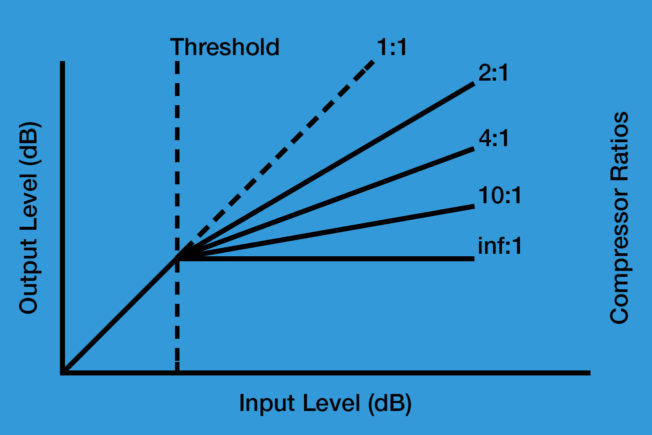
For now, ignore the ratios and focus on the threshold line. But to save any confusion, a ratio of 1:1 is no compression whatsoever.
We can see that the input level is represented on the x-axis and the y-axis represents the output level.
Before the threshold line, we can see that the input & output levels are exactly the same. Once the threshold line makes an appearance, the output level is dipped (and you can see that the amount of compression is set by ratio).
What Do Compressor Attack and Release Settings Do?
What is the attack time of a compressor? The attack time is the time it takes for the compressor to engage once the audio signal passes your threshold parameter.
Attack defines the time it takes for the compressor to meet its full volume reduction ratio after the threshold has been passed by the signal.
Release, if you haven’t guessed, is the time it takes for the compressor to disengage once the signal has dropped below your threshold parameter.
Therefore, a fast attack time such as 0ms (milliseconds) engages the compressor as soon as the signal bypasses your threshold, and a slow release time like 20ms will keep the compressor engaged for this long when the signal drops below the threshold… and vice versa.
However, slow attack and release times aren’t the same as delayed triggers where they wait for 20ms to go by before engaging. Instead, slow times means the compressor will gradually engage and disengage over a 20ms timespan.
The use of a slow attack time, for example, will keep the compressor engaged when the signal has dropped below your threshold. This means the compressor will be compressing the quieter parts of your signal too.
Attack and Release Can Have Consequences on Your Compressed Audio
So, a slow attack may mean you end up compressing your quieter signals. But what about a very quick attack?
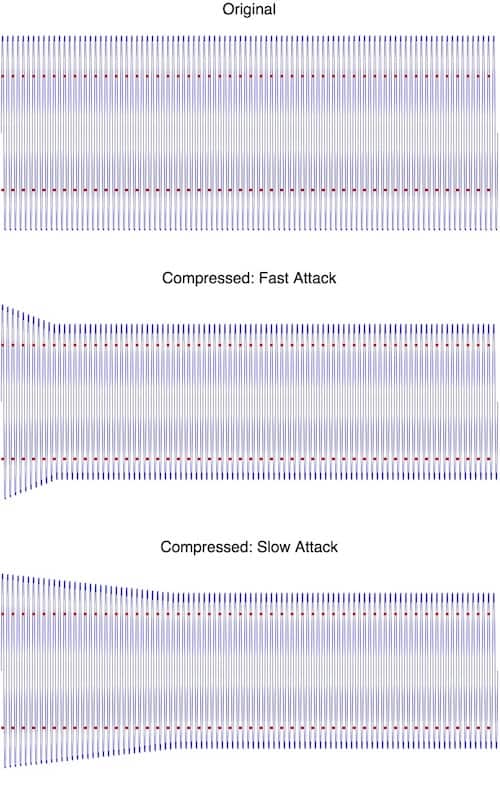
Should you choose to use an attack with 0ms, you may well affect the shape of the waveform itself rather than bring the peaks down.
Imagine a hammer hitting a nail. If you use one big hit to drive it into the wood, you risk bending the nail rather than sinking it into the wood. But if you hit it with less velocity over multiple hits, you are far more likely to send it down instead of bending it.
This can be useful for some percussion sounds like drum samples, but not always not for guitars or synths.
Above is an example of what could happen with the use of 0ms attack times. Notice how the compressor has flattened the peak of the waveform rather than the lower the smooth curve of the input signal.
With most things, there’s a yin and yang here.
The x-axis represents time, so you need to bear in mind that there are attack times that will be too long.
With an attack time that’s too long, your compressor won’t reach full attenuation because the signal will drop below the threshold before it has a chance to get there. Experiment and trust your ears. Let them guide you.
What Can Attack and Release Settings Do For My Sound?
Setting the right attack & release parameters are important for the final effect on your sound. Here are some examples of what attack and release can do to your signal, written by mynewmicrophone.com.
- Short attack times can thicken up a sound
- Short attack times can suck the life out of signals with significant transient information (drums, rap vocals, staccato strings, synth arps etc.)
- Long attack times can cause noticeable pumping of the output
- Long attack times can accentuate transient sounds by allowing them to pass before clamping down of the tail
- In general, short attack times will reduce the dynamic range more than long attack times
- Fast release times can sound more natural with low gain reduction
- Fast release times will cause pumping with high gain reduction
- Slow release times will smooth out dynamic audio signals
- Slow release times tend to push elements further in the mix (increased perceived depth)
- In general, fast release times will help reduce the dynamic range more than long release times
What is Ratio in Audio Compression?
As we mentioned in the threshold segment, the ratio dictates how compressed your audio will be once the threshold is passed.
Ratio sets the input level above the threshold over the output level above the threshold.
The ratio is broken down like this:
Input dB Above the Threshold : Output dB Above the Threshold
Here’s a breakdown of those ratios. Bear in mind that we said a 1:1 ratio is no compression at all.
2:1 = For every 2 dB the input signal is higher than your threshold, the compressor will output 1dB.
4:1 = For every 4 dB the input signal is higher than your threshold, the compressor will output 1dB.
10:1 = For every 10 dB the input signal is higher than your threshold, the compressor will output 1dB.
inf:1 = Known as hard compression or limiting, the compressor will not output any signal above your threshold.
Does Compression Ratio Affect the Sound?
Now I want you to take the numbers we’ve just discussed but think about them in a different manner.
If you were to apply a 10:1 ratio to a signal that only breaches the threshold by 7dB, the compressor would output a signal of 0.7. To understand what output your compressor will give you, divide the total signal dB over your threshold by the first number in the ratio.

In the example above, the ratio is represented by the red dotted line. Time on the x-axis and amplitude on the y-axis.
The input signal is higher than the threshold by 8dB. You can see in the first example that a 2:1 ratio has outputted a signal that’s higher than the threshold by 4dB, and a 4:1 ratio has outputted a signal higher than the threshold by 2dB.
8 divided 2 = 4
8 divided 4 = 2
And this is how ratio operates!
What is The Knee Control?
Now, not all compressors have a knee control. They’re not always necessary.
That being said, they do hold an important position.
Look at your actual knee. Whether it’s the right or left one, they do the same thing. They bend between about 90 to 180 degrees.
A knee on a compressor does just that but in the region of the threshold that you have set. Attack determines the speed of the compressor engaging, but knee allows you to determine how curved the transition from uncompressed to compressed will be! Here’s another great diagram by mynewmicrophone.com.
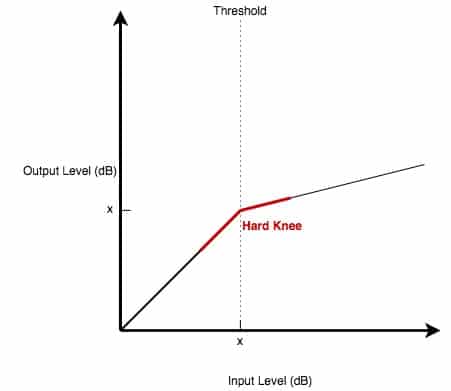
If you used a hard knee (on Serum this would be twisting the Knee knob all the way to the right), no compression would happen until the signal passes the threshold. Once the threshold has been met, the compressor will come in with full force.
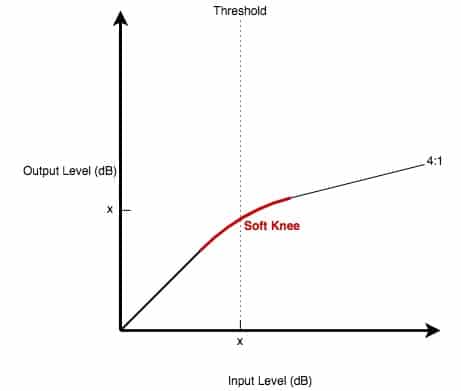
With a soft knee, the compressor doesn’t engage as soon as the threshold is met. As the signal approaches and passes the threshold, the knee will gradually begin engaging the compressor. Therefore, the transition from uncompressed to compressed is much less abrupt (and noticeable) with a soft knee.
As we said, not all compressors have a knee control. However, some compressors give you the choice of choosing between a hard or soft knee.
On the other hand, other compressors give you the choice of blending these two knee types. This control could be a simple minimum to maximum value or a percentage control.
More often, though, this control is defined as a decibel value that represents the decibel range between the compression start point (before the threshold is met) and the end (when the threshold is surpassed).
The smaller your decibel range is, the harder your knee will be.
What Does Makeup Gain Do?
The last basic feature we’re going to talk about is makeup gain.
When your compressor has done what it needs to do, your signal could be a little quiet. But do not fear!
Makeup gain is here to help.
This bad boy is a gain stage/control that makes up for the lost gain during the compression process.
The makeup gain is used to bring the peaking levels of your output signal back up to where they were before your compressor did its thing.
This allows us to hear the effect of our compressor completely. You’ve reduced the difference between your loudest and quietest points with all the steps we’ve discussed, so makeup gain is the final step to bring it all together. Without makeup gain, the final sound will probably sound too quiet.

What is The Lookahead Control?
Lookahead is a compressor feature that is very uncommon. However, they’re an incredibly useful tool.
Lookahead removes a compressors reliance on attack times because it allows the compressor to look ahead and see the input signal before the threshold has been surpassed.
This gives compressors the ability to act on fast transients that would otherwise pass through attack times, and the relief of dependence on attack times means the compressor has more time to react to changes in signal amplitude!
This result is a compression that sounds much more natural.
You’ve probably had experiences where your compressor outputs a noticeable downward pump to your sound when compression kicks in? Lookahead eliminates or almost eliminates this issue.
A compressed output with a lookahead control sounds much like a compressed signal that had a slow attack time, but the difference is transience is handled much more efficiently! This means the compressor acts straight away, with no messing about.
Down to business, am I right?
This tool is most effective when applied to compression techniques like sidechaining (more on this in a future article).
Lookahead works by duplicating the incoming signal and delays one of the duplicated signals. The signal that isn’t delayed is routed to the sidechain of your compressor, while the delayed signal is fed to your main compressor.
Once your undelayed signal passes the threshold, the sidechain triggers your compressor. The compressor then attenuates the delayed signal – and then this compressed signal is what is outputted.
This is how the compressor looks ahead. The delay time between signals is 1 to 10 milliseconds, so you won’t even perceive the compressed signal as being out of time! It’s a bit like magic (or computer science), really.
One issue to be aware of, however, is phase. DAW’s can fix this issue via delay compensation, which keeps all of your tracks in time by delaying all tracks by the exact same amount as the track with the most latency.