
How to Mix Beats Like A Pro
Whether in FL Studio, Ableton, Studio One, or any other DAW, mixing down beats is the same. There’s room for variation, but this process we’re about to walk you through is a tried and tested one – and it works in every DAW.
Knowing how to write beats is different from knowing how to mix beats. The mixdown process is where you can level your beta up from the rest unless you’ve already done that with its composition. You’re here because you want to know how to mix beats professionally and entrance your listener. You’re in the right place.
Learning how to mix beats does take time. This guide will help you on that journey, but you need to stay patient with yourself. You may not become an all start beat producer after one night. But if you continue to use these mixing practices in your beats, you’re on your way there.
So, let’s crack on and start mixing down.
Gain Stage Everything To Be -12dB
Having the correct gain staging before any other mixing takes place is vital when mixing your beats. Gain staging helps us guarantee that our beats aren’t going to clip.
For those that don’t know, clipping occurs on an audio signal when we push our signal gain louder than 0dB. 0dB is our dBFS ceiling in digital audio. It means our DAW can’t contain the signal and so it cuts everything that is breaching the dBFS ceiling which results in distortion.
Clipping on any channel also means you can’t place a limiter on your master channel. This is because the signal is already squashed and will only be squashed further. A limiter’s job is to keep everything below a certain level that you set. If your signal is already breaching the dBFS ceiling then you’re going to have a very squashed signal that nobody is going to enjoy listening to.
You’ll experience real problems with this when your kick/808‘s come into play.
Clipping occurs on an audio signal when we push our signal gain louder than 0dB
When these elements hit, they crank up the master gain. They’re going to be your loudest elements, so if your signal is clipping when they play, and you have a limiter on your master channel, the limiter will turn everything down for a few milliseconds until returning the level to normal when they have passed. Your beat will suffer, and it won’t sound professional.
To prevent clipping, just attenuate all of your channels to 0dB. Rather than use your mixer faders, use your channel gain knobs instead (this means you can start fresh with balanced mixer channels). Once done, raise the kick/808 to -16dB to -12dB. Now begin raising your other channels one at a time until they fit with your kick. Make sure none of them goes above -12dB. This leaves you enough headroom and you’re safe with the knowledge that clipping isn’t going to happen.
Assign Everything To A Mixer Channel
Before you do anything else, and if you haven’t already, assign each channel to an individual mixer channel so you can apply effects such as EQ, reverb, and compression. This gives you full control over each instrument for further levelling too.
EQ Each Of The Channels Where Needed
When EQ’ing, it’s a great idea to understand what frequencies we humans hear. From 20 Hz to 20kHz, the human frequency spectrum presents the scope of frequencies that humans hear.
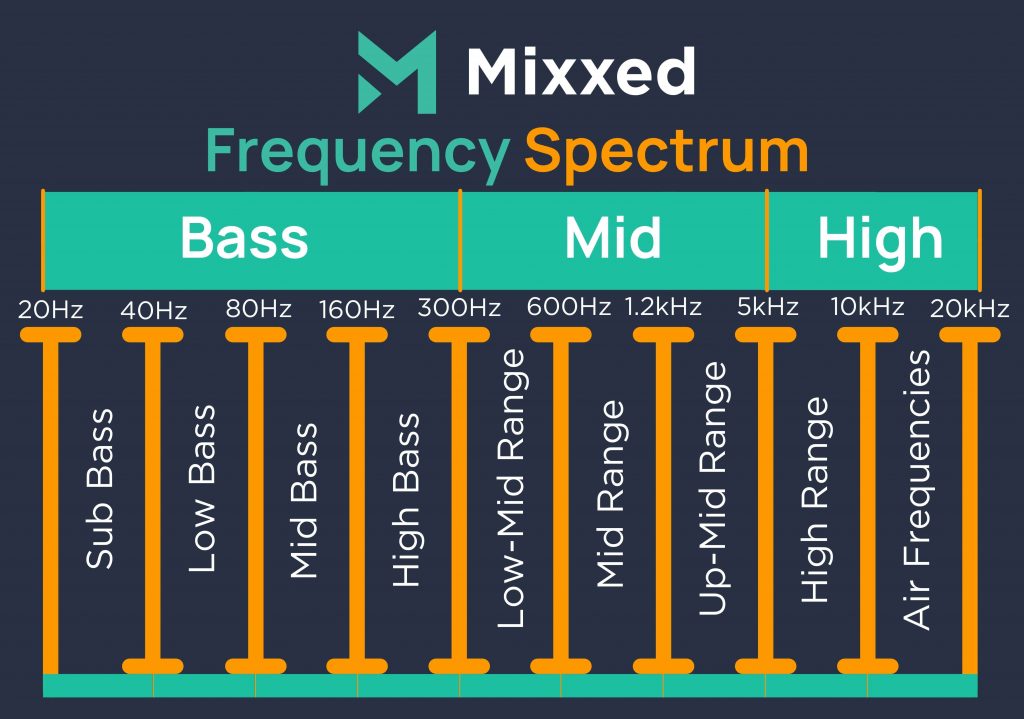
With our EQ, we want to ensure all elements in our mix are well balanced within the frequency spectrum. From low-end, mid-range, and high-end, we need to make sure no masking is occurring, our low-end isn’t muddy, and that no instrument is taking up excess space.
Your kick/808 is a dominant driving force in your beat. Therefore, if you have a bass channel that is overpowering your kick/808, you can use an EQ to carve the low conflicting frequencies out of the sound. However, it may be a better idea to remove the bass sound so it’s not paying when your kick/808 comes in. The point is to ensure no elements are masking (hiding) or generally overpowering the kick/808 in the low-end frequencies as this is where these elements sit. This way, your 808 has enough room to fit in without causing muddiness.
It’s the same principle everywhere else in your mix. Is a guitar channel overpowering your snare? Is a pad masking anything else?
Center Your Drums and Bass, Pan Everything Else Left and Right
Kick, Snare & 808 – Mono (Center)
We shouldn’t be panning kicks & 808. They shouldn’t have any stereo width at all. They contain bass frequencies, and low-end frequencies in stereo often just sound muddy.
You want the kick & 808 to be in the centre, right in your listener’s face. Keeping them in the centre keeps them at the front of your mix.
We shouldn’t be panning kicks & 808. They shouldn’t have any stereo width at all. They contain bass frequencies, and low-end frequencies in stereo often just sound muddy.
Snares – Stereo Panned/Mono
Snares tend to be stereo, but you could also have your snare in mono instead. Having a mono snare brings you the same result as a moo kick/9808 – it keeps it front and centre, and impactful. As you make something wider, you’re pushing it back in the mix. Sometimes, this isn’t desirable for our snare drum.
However, stereo imaging simulates space. This is why snares often sound better in stereo. That’s why it’s important to A/B test this on every mix that you work on, and determine that accordingly.
Or you could have the best of both worlds and apply a mid/side EQ to your snare drum. This allows you to keep everything around 300Hz in mono but everything above in stereo, which often has great results!
Percussion/Toms – Panned or Mono
Toms should often be front and centre, but not too loud as they could overpower your kick/808. Some gain attenuation will make your listeners perceive them as further back in your mix, and that’s exactly what we want.
But there are actually two ways that you can achieve this.
Panning Toms
Toms sit in the upper low-end and low mid ranges region on the frequency spectrum. This allows us to pan them to the sides in our mix. Not always desirable, but this allows us to create some cool spatial tricks if the track we’re working on permits it.
Mono Toms
However, usually, it’s better to keep our tom drums front and centre as we said. This is why keeping them mono is usually the better shout. But, when toms are set to mono they fight with the kick and the 808.
So, if you do want your toms drums in mono just have a high pass filter on their mixer channel and carve out anything below about 200Hz. To get the right balance, just continue carving above 200Hz until they sit better.
Add Effects
Finally, it’s time to add effects. This is an important stage as it allows us to easily fix issues within our mix, as well as add interesting flavours to our beats.
Reverb
If your beat sounds too dry, it needs a touch of reverb.
With reverb, we can create a simulation of space. Reverb can make our beats sound we’re playing them in a real space like a room or concert hall. This is all well and good, but it’s important that we don’t use too much.
Applying some automation to our reverb channel can allow us to spice up our transitions too. It can smoothen them ut and take up empty space at the same time.
The standard elements to apply reverb to are snare drums and vocals. But also apply reverb to any sounds that are dry, just not anything in the low end like your kick/808 and bass as reverb will make them sound muddy.
Saturation
Adding some light saturation can turn a dull sound into an exciting one. It’ll make boring sounds sound warmer! Saturation adds harmonic frequencies to a sound, so saturation can help us add new frequencies to a sound.
Saturation is great to add to vocals and even strings too. Make sure you’re analyzing via an EQ what frequencies are being added as to not overcrowd any frequency ranges.
Compression
Compression has a number of uses. It can also make or break our beats. It’s crucial to learn how to use it correctly.
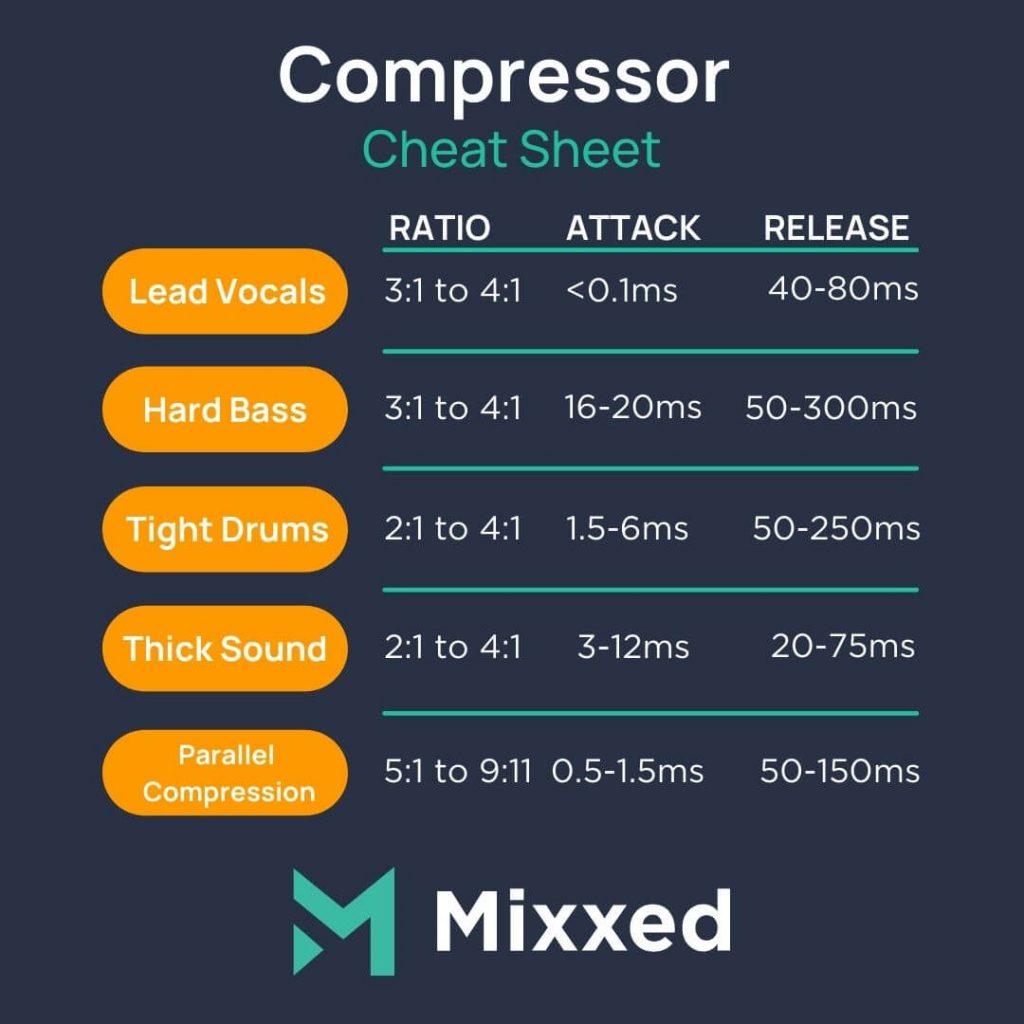
Compression can help us:
Shift Dynamic Range (the difference between the quietest and loudest points of a signal)
If your lead guitar, for example, the track has a dynamic range that’s too big and therefore taking up too much space, apply some light compression.
Experiment with a 2:1 ratio with a threshold of about 6dB. Feel free to change these values if you see fit, but also experiment with a fast attack and slow release time.
The amount of compression you apply should depend on what you’re compression. If drums, for example, a fast attack time will remove all transient information and make them lose their punch.
Shift the Transients
Transients are the short burst of energy at the beginning of every sound. We can use compression to boost or squash transient information and thus make it punchier or softer.
To make something puncher, just have a slow attack time and experiment with a low threshold and higher ratio. Take care not to square the soundwave off, though. This occurs when too much compression is applied and its sounds like a hum on your signal.
To make something softer, do the same, but set a short attack time.
Glue Elements Together
We recommend setting up a drum bus channel and inserting a compressor. by doing this, your drums will sound like they’re working together. You’re glueing them together!
Compressing them all together will create a unified sound that will improve your mix drastically.
Is your sample library up to the challenge of your professional sounding beats? If you’re in doubt, check this out…
The sampling revolution has risen in popularity and shaped music since the early 1970s. Sample culture continues to transform how millions of artists and producers do their thing in DAWs.
You too can break conventional norms, challenge the status quo, and open Pandora’s box of sound design.
Mixxed works with a growing number of sample labels and contributors to provide you with an affordable sample subscription service that’s more accessible than any before.
You’ll have access to our growing catalogue of loops, one-shots and sound effects that you can browse, download and keep forever for less than $3 a month.
Sign up today to find your sound!