
How to Make Electronic Music for Beginners: Mixing Music
Understanding how to mix music professionally is a game changer. But before you continue your music-making process and begin mixing your music, you first need to make sure that your composition is ready for the mixdown process.
Let’s talk about how to mix music. But jumping into your mixdown session without these next couple of things in place will set you back a few miles. Especially if you haven’t used high-quality sounds!
And that’s the first step to take before you begin mixing your track down. It’s crucial that your sounds are of high quality. A famous saying in the music production community is: “you can’t polish a turd”. Don’t worry – you can always replace any samples that don’t sound as professional as they could. Just head over to the Mixxed sample store to find any sound your track needs!
The other step is to make sure you’re happy with your composition. If you have to go back and rewrite a phrase then do it now. You’ll be saving yourself time down the line!
Oh, and mixing music is the same whether you’re on a laptop or a desktop computer. Whether you’re using headphones or studio monitors, the process remains the same. However, open-back headphones are far better for mixing purposes than closed-back headphones.
How to Choose Studio Headphones That’ll Fulfill Your Production Needs
How to Mix Music
When you’re happy with your composition and sound quality, it’s time to get mixing!
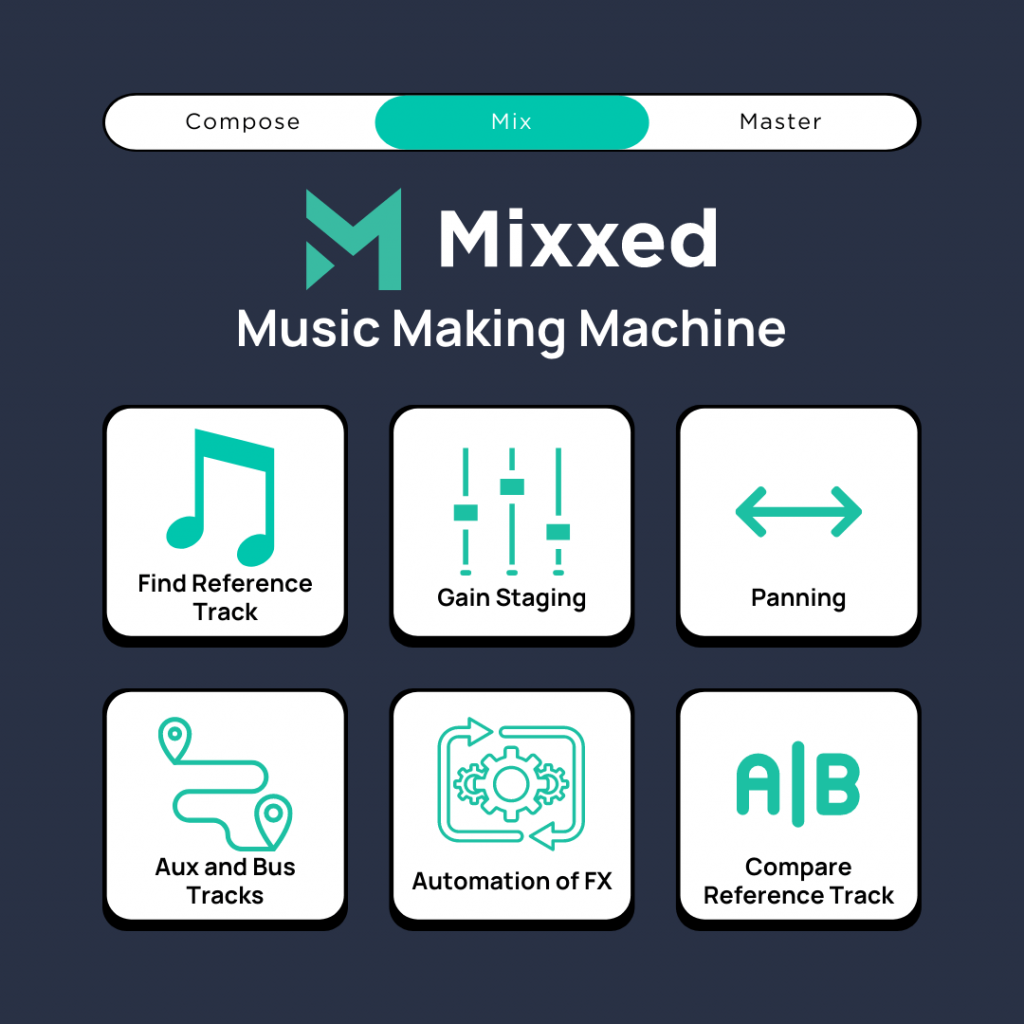
Find A Reference Track
Before you mix any song, your first step should be to find a reference track. Find a tune that is similar to yours so it embodies the qualities that you want yours to have.
For example, find a track with ambience if yours has just that. If your track focuses more on melodies and bass design, find a reference track that does too.
Essentially, you want a track that you can draw inspiration from. You may already have one that you found before you even started making the tune. Either way, start making notes about your reference track and what you think it does well. Take note of what elements are panned where, what is front and centre and what isn’t, what effects do you think the artist has used, etc.
Gain Staging
In truth, it’s good practice to gain stage as you compose. Not only does it save you time, but it also sets the foundations for the depth of your stereo image.
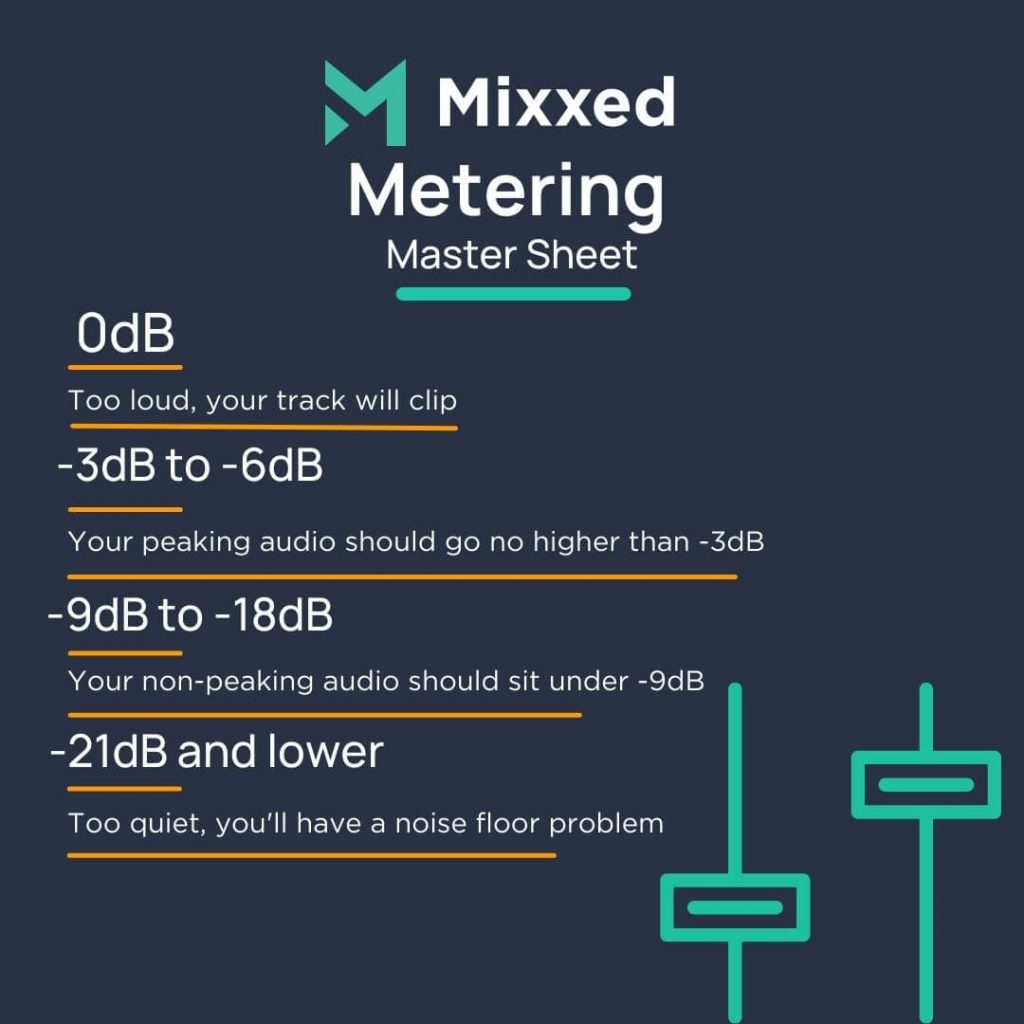
However, it’s not essential to gain stage as you go – you can do it right now. Attenuate all of your faders to -18dBFS as an average. Whether audio or MIDI tracks, make sure your peaks aren’t breaching -10dBFS.
We do this exercise to ensure that our mix has enough headroom for dynamic and other processing.
A very handy technique to get the best gain staging results is to turn everything down to absolute silence. Then turn up only your loudest elements (drums, then leads, bass etc.). Make sure that your channels aren’t breaching -6dBFS as a maximum.
Effective gain staging in the mixing stage will enable you to preserve your headroom as much as possible too. If you’re unsure what effective headroom looks like, check out our mixing article below.
When you have optimised your headroom, it’s time to start routing out any issues your track may have. These questions are key to getting the best mixdown possible:
- What problems do your channels and whole song have that need to be removed?
- What are your indivual signals and song as a whole missing?
- What do your channels and whole song have but could be enhanced?
Keeping these three questions fixed in your mind will allow you to journey through the mixing process and fix problems, improve characteristics and add new qualities to your song.
Corrective EQ: Remove Problem Frequencies
Before we dig into correcting errors, we should say do not aim for perfection. No finished track is perfect in the eye of any music producer. When mixing it is particularly easy to get caught up in chasing perfection, end up ignoring tiny details, and possibly lose perspective.
In the corrective stage, it’s your job to find any issues and ensure they aren’t perceivable to your listener. Ultimately, you’re looking to stop any unwanted issues from sneaking through to the final master.
Here are a couple of examples of issues that you should be looking out for.
Remove Unwanted Noise
Critically listen to the start, the end, and during quieter phrases of your track for any hissing, noise, rumblings, mic bleeding, or any other artefacts that aren’t supposed to be there.
To remove these artefacts, you have some options. Two common ones are corrective EQ’ing and noise gating.
Using an EQ you can isolate frequencies using a notch filter with a tight bandwidth. From here, you can attenuate this specific band until it’s inaudible in your mix.
On the other hand, you could use a noise gate – or both! You can set a minimum input level that a signal must pass in order to play. If your lead vocal has audible breath moments in quieter phrases, you can use a noise gate to set a level that only the louder parts of your vocal signal can breach.
Most of your noise will likely be in the low end of your frequency spectrum. If this is the case, you can use a low cut filter roll-off too. Be wary with your bandwidth Q here as a wider Q will keep the track sounding musical, so don’t use a tight Q!
Fix Harshness in Higher Frequencies
Specific instruments like vocals, keyboards, hi-hats, guitars, and even synthesizers can all create brief piercing volumes. Now it’s your job to monitor these channels for just that.
One of the best tools you can use to eliminate these piercing volumes is a de-esser. If you’re unfamiliar, a de-esser is a specific compressor plugin that tackles harsh transients like s’s & t’s (sibilance) in our vocabulary. But it only acts on specific frequency bands that you can set.
To find your problem frequencies, use a parametric EQ to find these sharp frequencies and reduce them when they’re too loud.
Start Panning
With the depth of your stereo field and your mixdown free of potential issues, we can move on and make it bigger.
Like gain staging, panning channels left and right is a technique used in every professional music production.
An important note here is that your drums, bass and (if you have them) vocals should all be kept in the centre of your stereo field. If you have vocal adlibs, speech samples, or any other vocal character that is not your lead vocal then these can all be panned however you like.
We keep our lead vocals, drums, bass in the centre of our stereo field so that they remain the focus of our listener’s attention and provide a framework for your other elements. We pan everything else that isn’t a lead element to really make the most of the stereo field available to us.
A general rule of thumb is to pan anything above 300Hz that isn’t one of the elements we’ve discussed. You’ll notice how your mix becomes dramatically less cluttered.
5 Psychoacoustic Sound Design Tips To Improve Your Sound Design, Mixing, and Music Production
Aux & Bus Tracks
Now it’s time to create some epic space with sends, aux tracks and bus tracks.
A bus track is a dedicated channel on your mixer that you send multiple signals to, and these multiple signals come from other individual channels on your mixer.
For example, send each of your individual drum channels (kick, snare, hats, etc.) all to one dedicated channel. On this dedicated channel, you can insert a compressor so that each drum channel gets the same compression applied to it. Make sure that the dedicated aux track is the only channel receiving the individual drum channels. You don’t want the signals to go to the master channel as well as the bus channel. It’s from the bus channel that the signal(s) make their way to the master channel.
Aux tracks, on the other hand, also accept signals from multiple other channels. The difference is that on an aux track, you also send the same multiple signals to the master channel as well as the aux track.
Another major difference between an aux and a bus is that you can’t record audio on an aux track. An aux track is dedicated to receiving duplicated signals for you to add external effects to the signal.
A great example of use for an aux track is effects like reverb and delay. It’s good practice to insert a reverb on one channel and a delay plugin on another. Then you can send any signal you like to these channels (as well as the master channel) and then use the volume faders to determine how much of the effects(s) are to be applied.
Newbies sometimes get confused about sends (I know I used to). They believe they serve the same function as an aux or a bus, but this is untrue.
A send is simply a parameter. It’s the knob that allows you to attenuate the level of the signal being sent to your aux track or bus track.
Automation of Effects
Now it’s time to apply some automation! You can automate those same volume faders, as well as the other parameters on any effect plugin on any channel, to increase or decrease in amount throughout your song!
You can automate filters, compression, reverb, delay, distortion – anything!
Why automate? Because automation allows you to generate new levels of interest and character through your song. Rather than keep everything constantly static, you can be experimental with automation on any and all parameters of every effect you have used.
The most common parameters to automate are reverb wet/dry and size and delay feedback.
If you have a phrase that isn’t overly busy, try and automate delay or reverb in this phrase to add excitement!
Compare Your Track and Reference Track
Finally, it’s time to compare your track to your reference track.
Grab the notes that you made about your reference track and begin comparing each element of your track with the elements of your reference track. Is your kick drum as impactful? Are your reverb tails short or long enough?
If you find anything that isn’t quite right then that’s okay. All you have to do is jump into the channel(s) of the elements in question and change them.
Your music production process should always start in one place: use great sounds!
The sampling revolution has risen in popularity and shaped music since the early 1970s. Sample culture continues to transform how millions of artists and producers do their thing in DAWs.
You too can break conventional norms, challenge the status quo, and open Pandora’s box of sound design.
Mixxed works with a growing number of sample labels and contributors to provide you with an affordable sample subscription service that’s more accessible than any before.
You’ll have access to our growing catalogue of loops, one-shots and sound effects that you can browse, download and keep forever for less than $3 a month.
Sign up today to find your sound!